
Before I was bitten by the papercrafting bug, sewing was my hobby so it was lovely to be able to combine the two with this project.I was really delighted with the response that I received to the cushion I made for the recent Frou Frou Pick of the Week. Leann Chivers asked me if I would do a step by step as so many of you had asked for details...... so here it is.
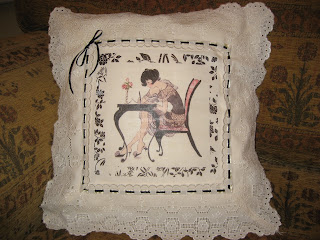 This is the cushion I made for the shows.


This is the one I made for the step by step guide. You of course can use any of the images on the Frou Frou digikits to get a totally unique design.
What you will need:-
What you will need:-
Frou Frou Serif Digi Kits Buy Here
2 pieces of cotton fabric 17 inches square
4 pieces of Lace 17 ½ inches wide. This lace should be 4 inches wide if
possible with an edge to slot ribbon through. If not you will also 4 pieces if
inch wide slotted lace. I used Broderie Anglaise for my cushions.
Ribbon for threading and for the bow.
Fabric transfer inkjet paper Shop here
10 inch zip.

Pieces of lace for trimming if required.
Open up your Craft Artist programme Available here
Choose Blank project
Choose 8x8 Scrapbook page.
Load Frou Frou Digi Kits.
Choose a square design; Drop it onto your page and
stretch to fill the whole page.
You can of course make your own design and add text. Remember
if you add text you will need to use the arrange tab on the right-hand side to
flip image and text horizontally so that when ironed onto fabric the text will
be correct way.
Print page onto Transfer paper. Make sure you insert it
the right way for your printer, you print onto the plain side.
To Make Cushion
With right sides together stitch a 5/8 seam from each
side leaving a 10 inch gap for the zip.
Open out the fabric and press the seams open.

Stitch in your zip.
Join the 4 pieces of lace together with a 5/8 seam at a
45degree angle. (Cut a square of card the depth of the lace fold diagonally
corner to corner, this can be laid against the join to give the 45 degree
angle. The top edge should be the widest.)

Trim seam to ¼ inch, overlock if you can to prevent
fraying. Make sure you trim seam so that
it doesn’t show in the corner. Press seam to one side.
Open up the fabric right side facing up.

Position your square of lace on one side, it should
overlap the edges.
Stitch in place on the inside edge.

If you are adding
extra slotted lace for the ribbon it should be added now.
Now fold the lace towards the centre and with right
sides facing pin and stitch the remaining 5/8 seams on the other 3 sides. Make
sure you do not catch the lace in the seam.
Trim seam allowance across the 4 corners to make it
easier to get sharp corners. Go close but do not cut through the stitching.
Turn cushion right-side out and press.
Catch the 4 corners to the seams of the lace to hold
the outside edge of the lace in place.

You are now ready to add the design that you have
chosen.
Trim around the picture leaving an excess of about ¼ inch.
Following the instructions on the transfer
paper place your design face down in the centre of your lace
square and iron onto cushion.
Thread ribbon through the slotted lace, start where you
would like the bow to be.
Tie the bow with the extra ends.
Add the extra lace if required.

I hope that you are able to follow these instructions and will produce a cushion to be proud of. I will be watching for your creations to appear on the Crafters Companion Facebook pages.
The step by step for Leann's bag is almost ready so will be published soon.
Thanks for popping by and Happy Crafting/Sewing
Thanks for popping by and Happy Crafting/Sewing
Margaret xx
6 comments:
Hurray been waiting for this i can try and make one now. Cant wait for the toilet bag instructions. Brilliant.
Wow stunning Margaret, they are both fab.
Hugs Julie xx
Thank you very good tutorial.
A fab tut Margaret, so detailed and easy to follow. :o)
Donna x
You're a diamond gem Margaret for doing these instructions and I can't wait for Leann's bag either. Thanks heaps
Post a Comment