Wednesday, 10 April 2013

Frou Frou Step by Step Guide for the Cushion Cover.


Before I was bitten by the papercrafting bug, sewing was my hobby so it was lovely to be able to combine the two with this project.I was really delighted with the response that I received to the cushion I made for the recent Frou Frou Pick of the Week. Leann Chivers asked me if I would do a step by step as so many of you had asked for details...... so here it is.
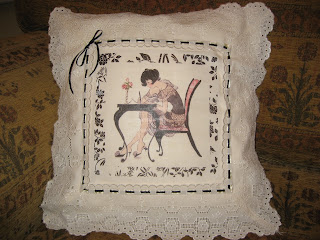
 This is the cushion I made for the shows.


This is the one I made for the step by step guide. You of course can use any of the images on the Frou Frou digikits to get a totally unique design.


What you will need:-

Frou Frou Serif Digi Kits   Buy Here

2 pieces of cotton fabric 17 inches square

4 pieces of Lace 17 ½ inches wide.    This lace should be 4 inches wide if possible with an edge to slot ribbon through. If not you will also 4 pieces if inch wide slotted lace. I used Broderie Anglaise for my cushions.

Ribbon for threading and for the bow.

Fabric transfer inkjet paper Shop here

10 inch zip.


Pieces of lace for trimming if required.

 To print your design.

Open up your Craft Artist programme    Available here

Choose Blank project

Choose 8x8 Scrapbook page.

Load Frou Frou Digi Kits.

Choose a square design; Drop it onto your page and stretch to fill the whole page.

You can of course make your own design and add text. Remember if you add text you will need to use the arrange tab on the right-hand side to flip image and text horizontally so that when ironed onto fabric the text will be correct way.

Print page onto Transfer paper. Make sure you insert it the right way for your printer, you print onto the plain side.

To Make Cushion

With right sides together stitch a 5/8 seam from each side leaving a 10 inch gap for the zip.

Open out the fabric and press the seams open.

Stitch in your zip.


Join the 4 pieces of lace together with a 5/8 seam at a 45degree angle. (Cut a square of card the depth of the lace fold diagonally corner to corner, this can be laid against the join to give the 45 degree angle. The top edge should be the widest.)

Trim seam to ¼ inch, overlock if you can to prevent fraying.  Make sure you trim seam so that it doesn’t show in the corner. Press seam to one side.

Open up the fabric right side facing up.

Position your square of lace on one side, it should overlap the edges.

Stitch in place on the inside edge.


If you are adding extra slotted lace for the ribbon it should be added now.


Now fold the lace towards the centre and with right sides facing pin and stitch the remaining 5/8 seams on the other 3 sides. Make sure you do not catch the lace in the seam.

Trim seam allowance across the 4 corners to make it easier to get sharp corners. Go close but do not cut through the stitching.
Turn cushion right-side out and press.
Catch the 4 corners to the seams of the lace to hold the outside edge of the lace in place.
You are now ready to add the design that you have chosen.
Trim around the picture leaving an excess of about ¼ inch.
Following the instructions on the transfer paper place your design face down in the centre of your lace square and iron onto cushion.
Thread ribbon through the slotted lace, start where you would like the bow to be.
Tie the bow with the extra ends.
Add the extra lace if required.

 IF YOU WISH TO RE-IRON YOUR CUSHION YOU MUST PROTECT THE PICTURE WITH THE PAPER YOU PEELED OFF. PLAIN SIDE DOWN ON THE PICTURE.
 
I hope that you are able to follow these instructions and will produce a cushion to be proud of. I will be watching for your creations to appear on the Crafters Companion Facebook pages.
The step by step for Leann's bag is almost ready so will be published soon.
Thanks for popping by and Happy Crafting/Sewing
Margaret xx

Tuesday, 19 March 2013

March Challenge Vintage Theme


Our challenge this month was to create a project with a vintage theme.
 
I have recently been creating wedding stationery for my niece so had lots of Brown and Cream bits and pieces so I decided to use this as my colour palette for a card, and of course it had to be Wedding based.
 
The image is taken from one of the Party Paws Serif Digikits which I changed to Sepia.
I added TEXT with the special Bamboo font which is automatically included into your available fonts.
Then I changed the page size to A5  but printed onto A4 which gave me plenty of room to cut around the image with a die. 
 
 
The die that I used is a Spellbinders Nestabilities Die called 5x7 Elegant labels 4 
The arch was cut from the middle size but before I removed it from the die I cut around the inside with a craft knife then cut the bottom part away.
 
The scalloped card was matted with Brown brocade card then the framed image.
The finishing touches were added to create my Vintage Wedding Card.
 
I look forward to seeing your creations.
 
Happy Crafting.  xx
 

Monday, 4 March 2013

Bamboo in Party Mood


Serif have teamed with Crafters Companion to bring out 3 digikits of the Party Paws artwork Which means that Bamboo can be added to all the templates available on Craft Artist.

Here are a few of the items within the Party section which I have created with the lovely Bamboo artwork.


Being in the party mood I then made some masks for the occasion.
 
 
The mask below is a smaller size and came about because I didn't change my printer layout to landscape. So a mistake turned out brilliantly for a childs mask.
So keep in portrait and click fit to page.


I also had a play with an A4 scrapbook layout, I'm not a Serif expert but with a bit of messing about
I arrived with the pages below.  Hope you like it.


I used a 2 hole punch and ribbon to join the book together.

Hope you enjoy the shows tomorrow. Thanks for popping by, if you'd like to leave a comment that would be great it's nice to get some feedback.

Happy Crafting. xx


Monday, 4 February 2013

When is an Easel not an Easel ???

A new little character enters the crafting world today, her name is Angelica and she has lots of fairy friends. Sara Davies will be launching a 4 Day Deal on Create and Craft and to celebrate Crafters Companion are holding a Blog Hop with a prize of ALL NINE stamp sets in the release.
 
All you have to do is leave a comment as you hop around then ONE random commenter on ONE UK team member's blog will win. (it's a prize worth over £35)
You have until Wednesday 6th Feb to leave a comment, winners will be announced on the CC UK blog Thursday 7th February; 

There is a CD as well as the stamps and 2 card kits. A Luxury Card Kit and an Easel Card Kit.
 
 
They are very easy to assemble and make a lovely quick card.
I thought I would see what else I could create instead of an easel card, so in answer to the question "When is an Easel not an Easel ?"
The answer could be......
When it's a GATEFOLD CARD
 
 
or when it's a DL card


or it could be a foldback apeture card.

 
but then again with a bit of extra card they make lovely wrap around tent cards.

 
Sandwich two together for a totally different look

 
Then again with a bit more time and some bits from your crafty stash you could create an apeture window with shutters.


 SO THE ANSWER TO THE QUESTION IS WHEN YOU GET CRAFTY !!!!!
 
Below are all the Design Team members who are taking part in the Blog Hop here and in the USA, if you started at the beginning Christiana Reuling is next.
 
So leave a comment as you go.Good Luck and enjoy the shows.
 
Luv Margaret
Ali Watson
Taylor Usry (US)
Rachel Brown
Chrissie Tobas (US)
Louise Welsh
Mary Dawn Quirindongo (US)
Tracy Watkiss
Stephanie Lee (US)
Bianca Shervington
Kendra Wietstock (US)
Caroline Weir
Stacy Harper-Watson (US)
Elaine Burnett
Stephanie Severin (US)
Edna Taylor
Trena Brannon (US)
Margaret Brown
Christiana Reuling (US)
Debbie Clough
Denise Coulter (US)
Donna Mosley
Khristen Foss (US)
Carol Van Der Westhuizen
Roxanne O'Brien (US)

Sunday, 3 February 2013

Angelica and Friends

Today I would like to share with you some cards I have made for the upcoming 4 Day Deal on Create and Craft.

Tomorrow Sara Davies will be launching a new range for Crafters Companion called Angelica and Friends.

 There are Stamps, a CD and two card kits, produced in conjunction with Hunkydory.
There is also foiled acetate and vellum to compliment the kits.

I have used the Luxury Card Kit to create these cards. I hope you like them.
 
 
This card was made from an A4 sheet which I cut into, I added a bit of coordinations for some mats.


There are several sheets of toppers some set into their own frames with decorative corners.Borders are also incorporated into the sheets.
 
 
The acetate and vellums have gorgeous foiling in several designs.
The acetate was strong enough to make this card.


Images appear on several of the sheets of cards and depending on which way you fold them form a lovely feature. The circular topper was mounted onto 2 Die'sire dies which were cut from some of the card and laced together with ribbon.


I think you will love this kit it is so pretty and is very versatile.

Tomorrow I will be part of a blog hop and will be sharing some different ways to use the Easel Kit, so hope you pop by. You could win all the stamps.

See you tomorrow.

Margaret

Wednesday, 16 January 2013

January Challenge Design Team Project

Well the challenge this month is ANYTHING BUT A CARD.
 
So my offering is a box handbag which I made using the Ultimate Pro.
 
 
It is made from a 12 x 12 sheet of Coordination card the decoration is made from Centura Pearl card  as is the flap. They are all cut using Die'sire dies.
 
To make the bag score a 12x12 sheet of cards on the A4 trifold line on the Ultimate Pro
Do this on all 4 sides.
You should have 9 squares.
Score each corner section from the point to the angle point.


Now measure half way across the centre section at the top and bottom of the sheet and make a small mark.
Score from that point  into the top corners  of  that square.


Now fold all score lines and burnish.


Push together and tuckflaps into each other as shown in the photo's below. 


You can stick the two large flaps at back and front down so that you form a box or you can have an exploding handbag.
Using some dies cut the flaps and decorate.
 
I used the Die'sire dies:-
Ornemental Flower for the front of the bag.
Magic Mirror for the flap cut in Centura card stock.
The small motifs are the two corners with the Classical Frame.
 
Punch 2 holes in the top and thread with ribbon. 
 
We look forward to seeing your creations.


Monday, 14 January 2013

It's Blooming A-May-Zing to be back !!!!

Yes I know it's been a while since I blogged, but sometimes life just gets in the way. I really am so impressed with my crafty friends who manage to blog every day.

 I have been busy creating however and can now share my efforts with you.


Today is a very exciting day for Nigel May's Angels our creations will be launching his new Blooming A-May-Zing CD live from the CHA trade fair in California. Imagine our cards beaming their way across the Atlantic!!!

The CD created by Crafters Companion for Nigel May from Create and Craft has some beautiful floral images spread over different sections. This is a box of the shaped cards with envelopes. There are also notepapers and I used some of the borders on ordinary envelopes to coordinate everything.


I have used the front panel of the Fushia shaped card for this 8 x 8 double front card and used a Die'sire lace edge to trim each layer.
Inside a Card Companion provides the focal point with some lovely bunting forming a detailed corner.


The double insert is made using 2 of the 8x8 inserts, one with a verse from the verse writer section, trimmed to fit.


There are also beautiful stamps to accompany the CD.  I used the Poppies and coloured them with Spectrum Noirs. As a change from red poppies I decided to do Himalayan Poppies which are a gorgeous turquoise.  Cut out from Neenah card with the Die'sire Grace Frame mounted onto toning Coordinations.
My second stamped card is the Fushia stamp which is gorgeous, mine are pale and delicate, I grew some like these this year in my garden, they were so pretty. The coordinating paper section on the CD has 12 really useful designs which you can have in any colour you can imagine.
 
 
Below I am posting some other cards I made from the CD one of which I have repeated as a Project for the Crafters Companion Project section.
 
 
I'm sure you will agree the images are so beautiful and very useful, they will cover so many occasions.
Nigel will be launching this CD at 6pm and 8pm live from America on Create and Craft.
See you there!


Wednesday, 14 November 2012

Flower Quilling Dies

This is a sample of some of the things that you can make with the new quilling dies just released by Crafters Companion and appearing on Create and Craft.
 
They cut on all die cutting systems and cut through many different materials. Like felt which I used to create to create this hairband.
 
 The flowers on the wall hanging below were cut from Adorable Scoreable Card and Posh wrapping paper.  


I'm sure you will love playing with these dies to create beautiful flowers.


Thursday, 1 November 2012

November Design Team Challenge


It can't be November already, I haven't started my own Christmas cards yet !
(Note to self....you need to get started. NOW)
 
Never mind, the card I would like to share with you is one using one of my all time favourite colour combinations of Aqua and Brown . Turq is good as well. 
 (In fact you know those Christmas cards I'm about to start well this is my colour scheme this year.)
 
Back to the card.
 
Crafters Companion Challenge this month is a card featuring your favourite colour combination, so we look forward to seeing your lovely creations.
My card for this month is made using one of Sheena Douglass's Little Bit Sketchy stamps, I love this image it is so useful for the men in your life.


Hope you like it.
 
Right off to find the Turquoise glitter!!!!!!
 
Keep Crafting.
 
Margaret xxxx